 SkyWalking Cloud on Kubernetes
Getting Started
This document introduces how to create a kubernetes cluster locally using kind and how to deploy the basic skywalking components to the cluster.
Supported SkyWalking versions
| Component | Supported | Recommended |
|---|---|---|
| OAP | 10.4.0 and later | 11.0.0 |
| UI | Horizon 1.0.0 and later | Horizon 1.0.0 |
| BanyanDB | matched to the OAP – 0.11.x for OAP 11.0.0 | 0.11.0 |
These move together. OAP 11.0.0 accepts BanyanDB server API 0.11 only, and the Horizon UI reaches
OAP over an admin host that arrived in 11.x, so an older OAP is not a combination the Horizon UI
supports. An OAPServer below 10.4.0 is admitted with a warning rather than rejected – a cluster
already running one keeps working.
The legacy Booster UI is not supported: apache/skywalking removed it in 11.0.0 and no longer
builds an image for it.
Prerequisites
Step1: Create a kubernetes cluster locally using kind
Note: If you have a kubernetes cluster (> v1.21.10) already, you can skip this step.
Here we create a kubernetes cluster with 1 control-plane node and 1 worker nodes.
$ cat <<EOF | kind create cluster --config=-
kind: Cluster
apiVersion: kind.x-k8s.io/v1alpha4
nodes:
- role: control-plane
  image: kindest/node:v1.21.10
- role: worker
  image: kindest/node:v1.21.10
EOF
Expected output
Creating cluster "kind" ...
 ✓ Ensuring node image (kindest/node:v1.21.10) 🖼
 ✓ Preparing nodes 📦 📦
 ✓ Writing configuration 📜
 ✓ Starting control-plane 🕹️
 ✓ Installing CNI 🔌
 ✓ Installing StorageClass 💾
 ✓ Joining worker nodes 🚜
Set kubectl context to "kind-kind"
You can now use your cluster with:

kubectl cluster-info --context kind-kind

Not sure what to do next? 😅  Check out https://kind.sigs.k8s.io/docs/user/quick-start/
Check all pods in the cluster.
$ kubectl get pods -A
Expected output
NAMESPACE            NAME                                         READY   STATUS    RESTARTS   AGE
kube-system          coredns-558bd4d5db-h5gxt                     1/1     Running   0          106s
kube-system          coredns-558bd4d5db-lhnvz                     1/1     Running   0          106s
kube-system          etcd-kind-control-plane                      1/1     Running   0          116s
kube-system          kindnet-fxlkm                                1/1     Running   0          106s
kube-system          kindnet-vmcvl                                1/1     Running   0          91s
kube-system          kube-apiserver-kind-control-plane            1/1     Running   0          116s
kube-system          kube-controller-manager-kind-control-plane   1/1     Running   0          116s
kube-system          kube-proxy-nr4f4                             1/1     Running   0          91s
kube-system          kube-proxy-zl4h2                             1/1     Running   0          106s
kube-system          kube-scheduler-kind-control-plane            1/1     Running   0          116s
local-path-storage   local-path-provisioner-74567d47b4-kmtjh      1/1     Running   0          106s
Step2: Build the operator image
Check into the root directory of SWCK and build the operator image as follows.
$ cd operator
# Build the operator image
$ make docker-build
You will get the operator image controller:latest as follows.
$ docker images
REPOSITORY     TAG        IMAGE ID       CREATED          SIZE
controller     latest     84da7509092a   22 seconds ago   53.6MB
Load the operator image into the kind cluster or push the image to a registry that your kubernetes cluster can access.
$ kind load docker-image controller
or
$ docker push $(YOUR_REGISTRY)/controller
Step3: Deploy operator on the kubernetes cluster
Install the CRDs as follows.
$ make install
Check the CRDs are installed successfully.
Expected output
kubectl get crd | grep skywalking
banyandbs.operator.skywalking.apache.org                 2023-11-05T03:30:43Z
fetchers.operator.skywalking.apache.org                  2023-11-05T03:30:43Z
javaagents.operator.skywalking.apache.org                2023-11-05T03:30:43Z
oapserverconfigs.operator.skywalking.apache.org          2023-11-05T03:30:43Z
oapserverdynamicconfigs.operator.skywalking.apache.org   2023-11-05T03:30:43Z
oapservers.operator.skywalking.apache.org                2023-11-05T03:30:43Z
satellites.operator.skywalking.apache.org                2023-11-05T03:30:43Z
storages.operator.skywalking.apache.org                  2023-11-05T03:30:43Z
swagents.operator.skywalking.apache.org                  2023-11-05T03:30:43Z
uis.operator.skywalking.apache.org                       2023-11-05T03:30:43Z
Deploy the SWCK operator to the cluster.
$ make deploy
Or deploy the SWCK operator to the cluster with your own image.
$ make deploy OPERATOR_IMG=$(YOUR_REGISTRY)/controller
Get the status of the SWCK operator pod.
$ kubectl get pod -n skywalking-swck-system
NAME                                                 READY   STATUS    RESTARTS   AGE
skywalking-swck-controller-manager-5f5bbd4fd-9wdw6   2/2     Running   0          34s
Step4: Deploy skywalking componentes on the kubernetes cluster
Create the skywalking-system namespace.
$ kubectl create namespace skywalking-system
Deploy the skywalking components to the cluster. Every OAPServer needs a storage – SkyWalking
removed the embedded H2 in 10.2.0 and there is no fallback – so this starts a BanyanDB alongside
it and points the OAP at it.
$ cat <<EOF | kubectl apply -f -
apiVersion: operator.skywalking.apache.org/v1alpha1
kind: BanyanDB
metadata:
  name: storage
  namespace: skywalking-system
spec:
  version: 0.11.0
  counts: 1
  image: apache/skywalking-banyandb:0.11.0
  config:
    - "standalone"
---
apiVersion: operator.skywalking.apache.org/v1alpha1
kind: Storage
metadata:
  name: storage
  namespace: skywalking-system
spec:
  type: banyandb
  connectType: external
  address: storage-banyandb-grpc.skywalking-system:17912
  version: 0.11.0
---
apiVersion: operator.skywalking.apache.org/v1alpha1
kind: OAPServer
metadata:
  name: skywalking-system
  namespace: skywalking-system
spec:
  version: 11.0.0
  instances: 1
  image: apache/skywalking-oap-server:11.0.0
  storage:
    name: storage
  service:
    template:
      type: ClusterIP
---
apiVersion: operator.skywalking.apache.org/v1alpha1
kind: UI
metadata:
  name: skywalking-system
  namespace: skywalking-system
spec:
  # horizon -- the SkyWalking UI -- is the only supported kind, and the default.
  kind: horizon
  # The Horizon version, not the OAP version: the two are released separately,
  # and Horizon shares the skywalking-ui repository behind a horizon- tag prefix.
  version: 1.0.0
  instances: 1
  image: apache/skywalking-ui:horizon-1.0.0
  OAPServerAddress: http://skywalking-system-oap.skywalking-system:12800
  service:
    template:
      type: ClusterIP
    ingress:
      host: demo.ui.skywalking
EOF
The UI
spec.kind accepts one value, horizon, which is also the default. It deploys the SkyWalking UI:
| Default image | Listens on | OAP wire-up |
|---|---|---|
apache/skywalking-ui:horizon-<ver> |
8081 |
HORIZON_* environment variables |
Horizon shares the apache/skywalking-ui repository with the retired Booster UI and is told apart
by the horizon- tag prefix, so a spec.version here is the Horizon version — 1.0.0 — not
the OAP one. The two are released separately.
The legacy Booster UI is no longer supported: apache/skywalking removed its submodule in 11.0.0
and no longer builds an image for it. A UI that still says kind: booster is rejected, with a
message pointing at this page.
The operator writes no config file. Horizon’s image bakes a fully tokenised horizon.yaml, so the
operator sets only what this deployment determines — the oap.* hosts and the template mode — as
HORIZON_* environment variables, and everything else stays on Horizon’s own defaults. See
Configuring Horizon below.
Template mode, and OAP 10.x
spec.templatesMode selects where Horizon reads dashboard templates from:
| Value | Templates come from | Needs |
|---|---|---|
live (default) |
OAP’s ui_template store, seeded and edited through /ui-management/templates* |
OAP 11.x, and OAPServerAdminAddress set |
readonly |
The bundle inside the Horizon image; the template admin surface is read-only | nothing beyond the query host |
On OAP 10.x you must set readonly. OAP 10 does have persistent template management, but over
legacy query-port GraphQL, and Horizon implements only the OAP 11 REST protocol. In live mode the
store is unreachable, and Horizon blocks every layer-driven page — Traces most visibly — rather than
render a layer whose published template it cannot read.
The operator cannot pick this for you: a UI resource carries an OAP address, not an OAP
version. On OAP 10.x:
spec:
  kind: horizon
  version: 1.0.0
  templatesMode: readonly
  OAPServerAddress: http://skywalking-system-oap.skywalking-system:12800
The admin-port features — Inspect, DSL management, the live debugger, the alarm-rule editor and the Cluster Status admin pane — are OAP 11 only regardless of this setting.
Configuring Horizon
Horizon’s image bakes a fully tokenised horizon.yaml, so every setting it has is reachable as an
environment variable. The operator sets only what it derives from the fields above — the OAP hosts
and the template mode — and leaves the rest to spec.env and spec.envFrom:
spec:
  kind: horizon
  version: 1.0.0
  OAPServerAddress: http://skywalking-system-oap.skywalking-system:12800
  env:
    - name: HORIZON_SESSION_COOKIE_SECURE     # behind TLS
      value: "true"
    - name: HORIZON_TRUST_PROXY
      value: "1"
  envFrom:
    - secretRef:
        name: horizon-secrets                 # password hashes, API keys, signing keys
Naming a variable the operator derives wins over the derived value. Which variables exist, and what they do, is Horizon’s documentation to give — this operator does not keep a list, so a setting added in a Horizon release works here without an SWCK release.
Horizon serves plain HTTP and does not terminate TLS itself; run it behind an ingress and tell it so
with HORIZON_PUBLIC_URL, HORIZON_TRUST_PROXY and HORIZON_SESSION_COOKIE_SECURE.
spec.config still takes a whole horizon.yaml and mounts it at /app/horizon.yaml. That replaces
the baked file, and with it every token — so no HORIZON_* variable applies any more, including the
ones the operator sets. Prefer env/envFrom unless a whole file is genuinely easier.
Signing in
Horizon protects its API with RBAC, and ships with no users — its baked config carries
auth.local.users empty. A UI comes up, serves, and refuses every login: /api/auth/health
reports configured: false and the sign-in page shows a setup-required banner.
There is no first-run wizard: a user has to exist in the config. Seed one with
HORIZON_AUTH_LOCAL_USERS, which takes the same JSON array the config field does. It carries a
password hash, so it belongs in a Secret and reaches the pod through spec.envFrom:
kubectl create secret generic horizon-users -n skywalking-system \
  --from-literal=HORIZON_AUTH_LOCAL_USERS='[{"username":"admin","passwordHash":"$argon2id$v=19$...","roles":["admin"]}]'
spec:
  kind: horizon
  version: 1.0.0
  OAPServerAddress: http://skywalking-system-oap.skywalking-system:12800
  envFrom:
    - secretRef:
        name: horizon-users
Generate the hash with pnpm --filter bff cli:hash in the Horizon repository; never a plaintext
password. Everything else — LDAP, SSO, RBAC, session settings — is set the same way, one variable
at a time, and anything left out keeps Horizon’s default. The full surface, with every field, its
default and the variable that sets it, is
horizon.yaml in the
Horizon repository.
spec.config still takes a whole file if you would rather manage one, but it replaces the baked
config and every ${HORIZON_...} token in it — so the operator’s own variables stop applying too,
and it must then carry the oap.* hosts itself.
Then sign in at POST /api/auth/login, which sets a horizon_sid session cookie; API tokens are
the other way in. test/tools/horizon.sh does exactly this and is
what the e2e suite uses.
One thing to know about the state directory: the operator mounts /data as an emptyDir, so
anything Horizon writes there does not survive a pod restart.
When spec.kind: horizon, the operator additionally:
-
Sets
HORIZON_OAP_QUERY_URLfromspec.OAPServerAddress, plusHORIZON_OAP_ADMIN_URLandHORIZON_OAP_ZIPKIN_URLif, and only if, you setspec.OAPServerAdminAddressandspec.OAPServerZipkinAddress.Neither of those two is derived for you, on purpose. The OAP admin host arrived in 11.x; on a 10.x release port 17128 is the AI-pipeline URI-recognition server, so a derived admin URL would point Horizon at a live endpoint that is the wrong service. Set
spec.OAPServerAdminAddresstohttp://<oapserver>-oap.<namespace>:17128when your OAP is 11.x and you want the runtime-rule and template features. Likewise theOAPServerthis operator deploys exposes no Zipkin query port, so there is nothing to derive azipkinUrlfrom. -
Sets
HORIZON_TEMPLATES_MODE. Left to itself this follows the admin address:liveneeds a reachable admin host to read OAP’s template store, so it is chosen only whenspec.OAPServerAdminAddressis set, andreadonly— which renders the templates bundled in the image — otherwise. Override withspec.templatesMode. -
Mounts an
emptyDirat/datafor Horizon’s writable state. State is lost on pod restart.
Set spec.config to a raw horizon.yaml string to replace the file baked into the image. That
also replaces every ${HORIZON_...} token in it, so no HORIZON_* variable applies any more —
including the ones the operator sets above. Prefer spec.env / spec.envFrom.
Note: the OAPServer Service exposes port 17128 (admin) in addition to 12800/11800/1234 so Horizon UI can reach runtime-rule, DSL/MQE debug, and inspect endpoints. The admin port must be enabled in your OAP configuration for Horizon’s admin features to work.
Minimal horizon example (the image is defaulted; the admin and Zipkin URLs are not — see above):
apiVersion: operator.skywalking.apache.org/v1alpha1
kind: UI
metadata:
  name: skywalking-system
  namespace: skywalking-system
spec:
  kind: horizon              # default — can be omitted
  version: 1.0.0             # the Horizon version, not the OAP version
  instances: 1
  OAPServerAddress: http://skywalking-system-oap.skywalking-system:12800
  service:
    template:
      type: ClusterIP
    ingress:
      host: demo.ui.skywalking
Check the status of the skywalking components.
$ kubectl get pod -n skywalking-system
NAME                                     READY   STATUS    RESTARTS   AGE
skywalking-system-oap-68bd877f57-fhzdz   1/1     Running   0          6m23s
skywalking-system-ui-6db8579b47-rphtl    1/1     Running   0          6m23s
Step5: Use the java agent injector to inject the java agent into the application pod
Label the namespace where the application pod is located with swck-injection=enabled.
$ kubectl label namespace skywalking-system swck-injection=enabled
Create the application pod.
Note: The application pod must be labeled with
swck-java-agent-injected=trueand theagent.skywalking.apache.org/collector.backend_serviceannotation must be set to the address of the OAP server. For more configurations, please refer to the guide.
$ cat <<EOF | kubectl apply -f -
apiVersion: apps/v1
kind: Deployment
metadata:
  name: demo
  namespace: skywalking-system
spec:
  selector:
    matchLabels:
      app: demo
  template:
    metadata:
      labels:
        # enable the java agent injector
        swck-java-agent-injected: "true"
        app: demo
      annotations:
        agent.skywalking.apache.org/collector.backend_service: "skywalking-system-oap.skywalking-system:11800"
    spec:
      containers:
      - name: demo1
        imagePullPolicy: IfNotPresent
        image: ghcr.io/apache/skywalking-swck-spring-demo:v0.0.1
        command: ["java"]
        args: ["-jar","/app.jar"]
        ports:
          - containerPort: 8085
        readinessProbe:
          httpGet:
            path: /hello
            port: 8085
          initialDelaySeconds: 3
          periodSeconds: 3
          failureThreshold: 10
---
apiVersion: v1
kind: Service
metadata:
  name: demo
  namespace: skywalking-system
spec:
  type: ClusterIP
  ports:
  - name: 8085-tcp
    port: 8085
    protocol: TCP
    targetPort: 8085
  selector:
    app: demo
EOF
Check the status of the application pod and make sure the java agent is injected into the application pod.
$ kubectl get pod -n skywalking-system -l app=demo -ojsonpath='{.items[0].spec.initContainers[0]}'
Expected output
{"args":["-c","mkdir -p /sky/agent \u0026\u0026 cp -r /skywalking/agent/* /sky/agent"],"command":["sh"],"image":"apache/skywalking-java-agent:8.16.0-java8","imagePullPolicy":"IfNotPresent","name":"inject-skywalking-agent","resources":{},"terminationMessagePath":"/dev/termination-log","terminationMessagePolicy":"File","volumeMounts":[{"mountPath":"/sky/agent","name":"sky-agent"},{"mountPath":"/var/run/secrets/kubernetes.io/serviceaccount","name":"kube-api-access-4qk26","readOnly":true}]}
Also, you could check the final java agent configurations with the following command.
$ kubectl get javaagent -n skywalking-system -l app=demo -oyaml
Expected output
apiVersion: v1
items:
- apiVersion: operator.skywalking.apache.org/v1alpha1
  kind: JavaAgent
  metadata:
    creationTimestamp: "2023-11-19T05:34:03Z"
    generation: 1
    labels:
      app: demo
    name: app-demo-javaagent
    namespace: skywalking-system
    ownerReferences:
    - apiVersion: apps/v1
      blockOwnerDeletion: true
      controller: true
      kind: ReplicaSet
      name: demo-75d8d995cc
      uid: 8cb64abc-9b50-4f67-9304-2e09de476168
    resourceVersion: "21515"
    uid: 6cbafb3d-9f43-4448-95e8-bda1f7c72bc3
  spec:
    agentConfiguration:
      collector.backend_service: skywalking-system-oap.skywalking-system:11800
      optional-plugin: webflux|cloud-gateway-2.1.x
    backendService: skywalking-system-oap.skywalking-system:11800
    podSelector: app=demo
    serviceName: Your_ApplicationName
  status:
    creationTime: "2023-11-19T05:34:03Z"
    expectedInjectiedNum: 1
    lastUpdateTime: "2023-11-19T05:34:46Z"
    realInjectedNum: 1
kind: List
metadata:
  resourceVersion: ""
  selfLink: ""
If you want to check the logs of the java agent, you can run the following command.
$ kubectl logs -f -n skywalking-system -l app=demo -c inject-skywalking-agent
Step6: Check the application metrics in the skywalking UI
First, port-forward the demo service to your local machine.
$ kubectl port-forward svc/demo 8085:8085 -n skywalking-system
Then, trigger the application to generate some metrics.
$ for i in {1..10}; do curl http://127.0.0.1:8085/hello && echo ""; done
After that, you can port-forward the skywalking UI to your local machine.
$ kubectl port-forward svc/skywalking-system-ui 8080:80 -n skywalking-system
Open the skywalking UI in your browser and navigate to http://127.0.0.1:8080 to check the application metrics.
Expected output
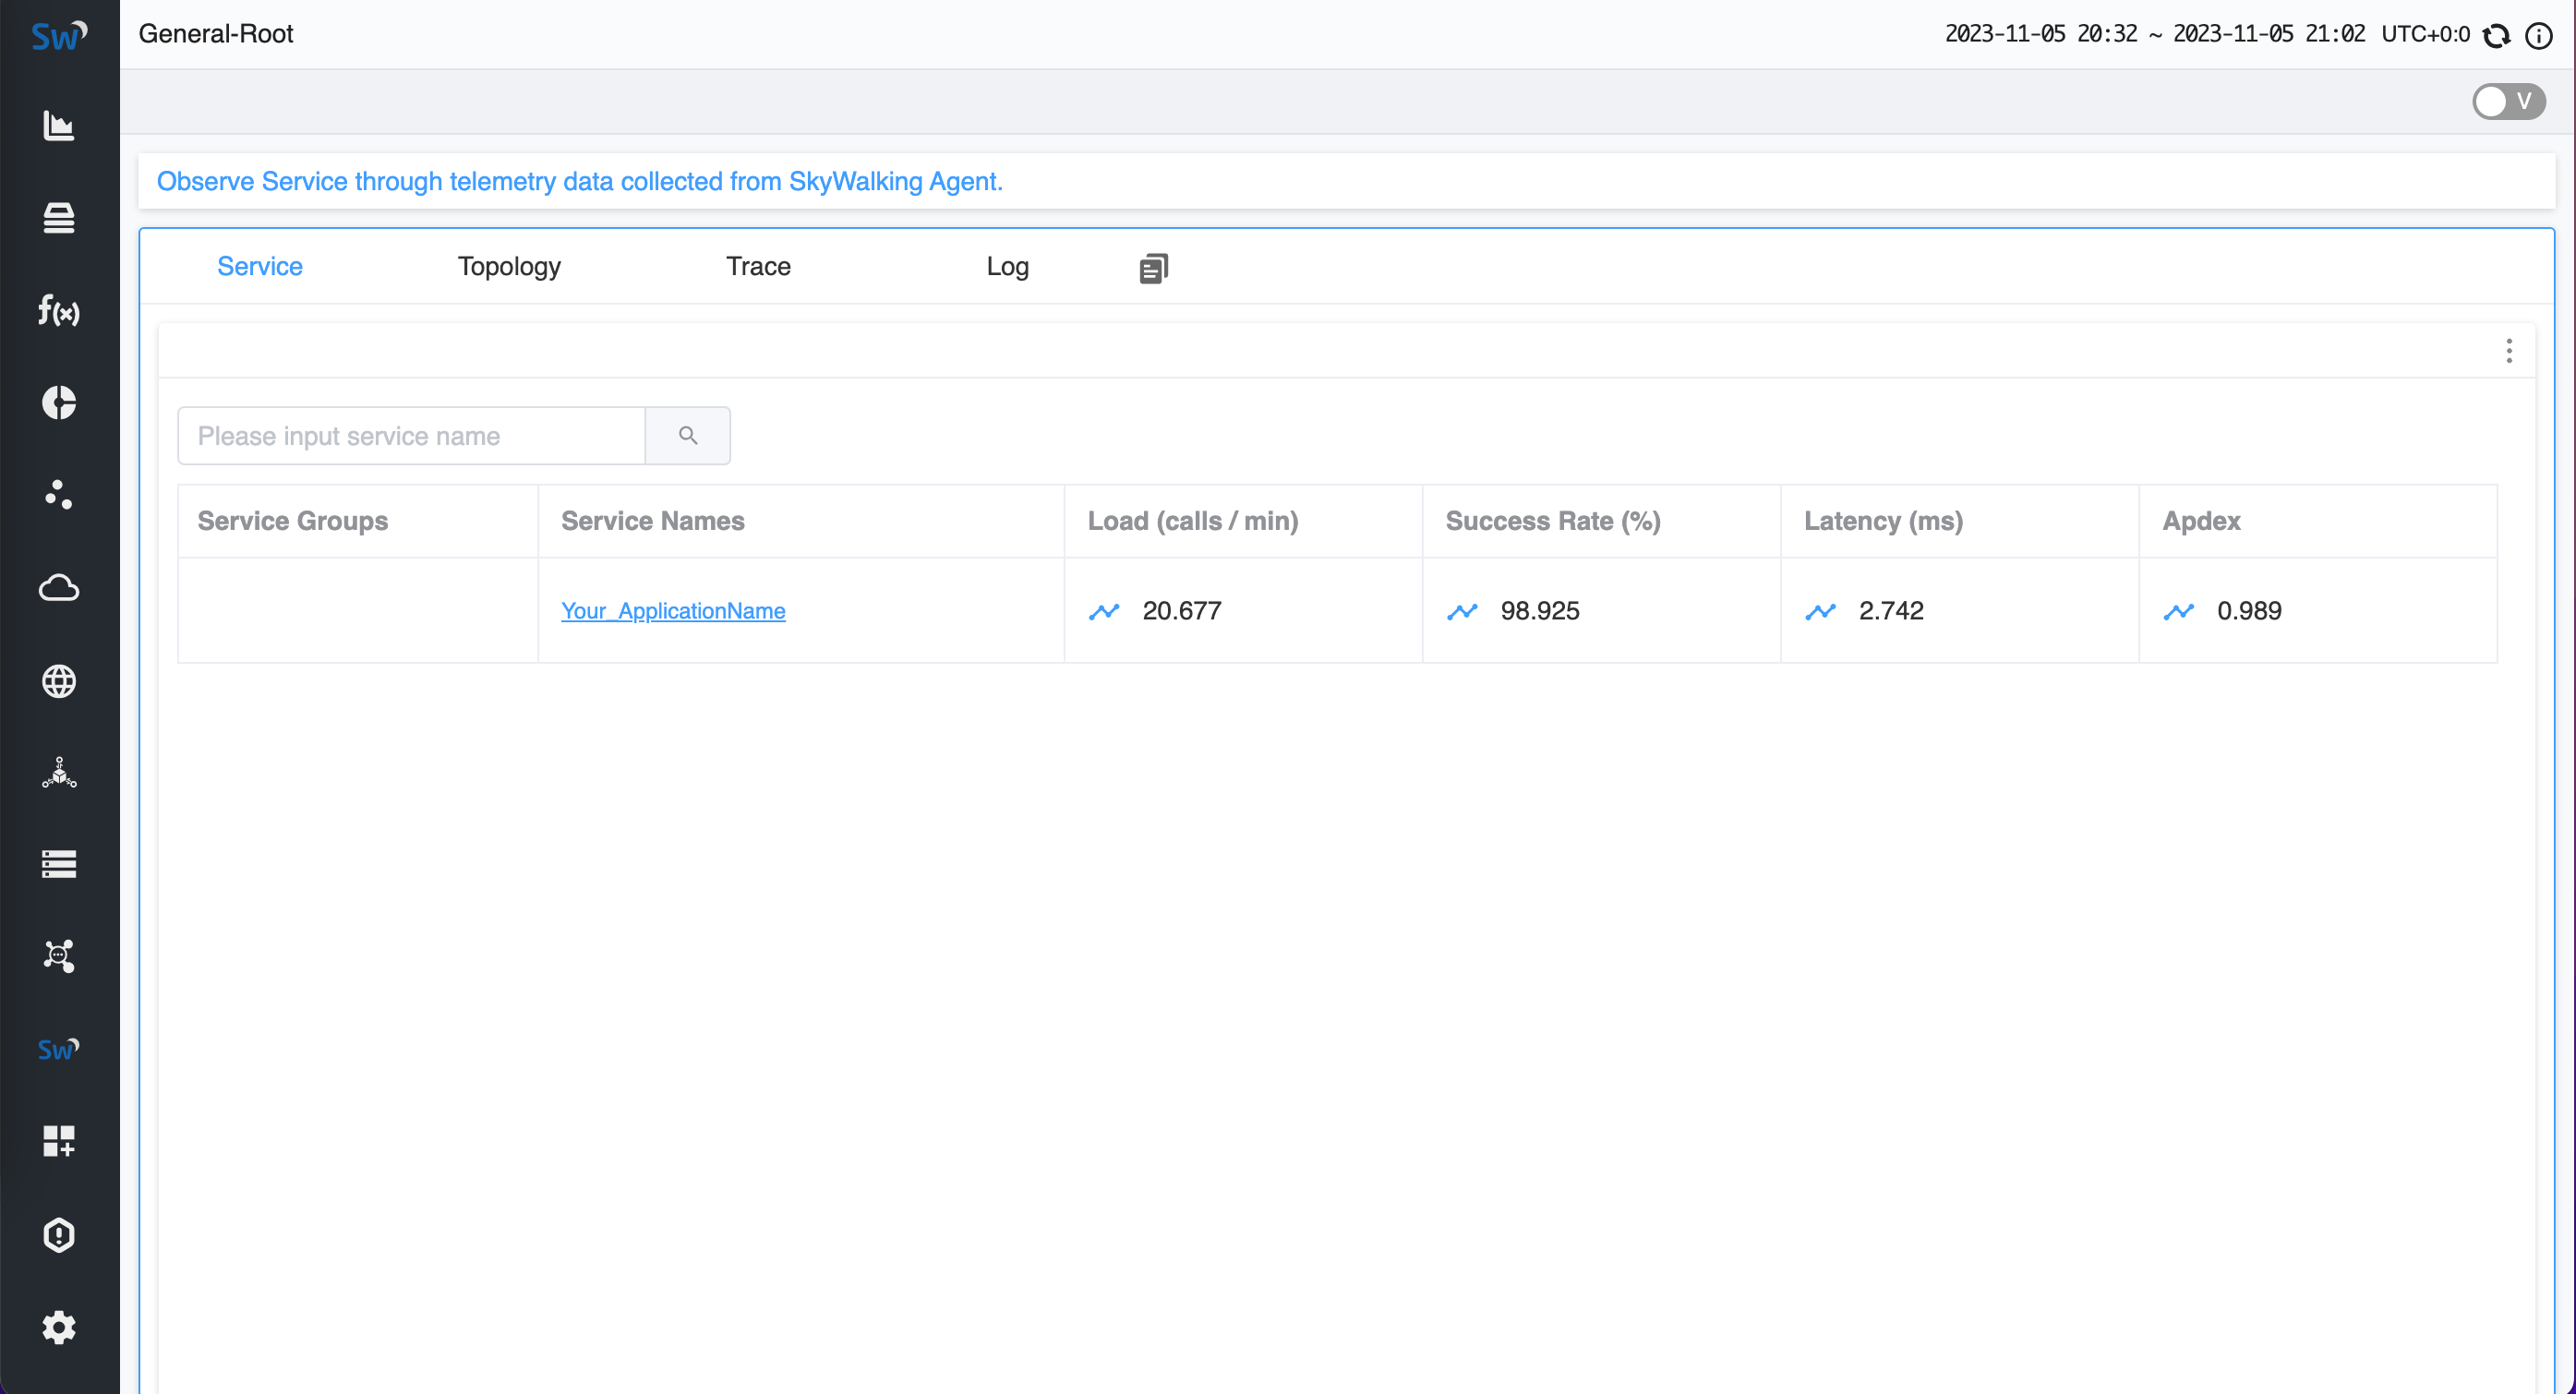
Also, if you want to expose the external metrics to the kubernetes HPA, you can follow the guide to deploy the custom metrics adapter and you may get some inspiration from the e2e test.